Container Networking
Simulating a container networking solution
With Only Linux Commands
How does networking work within the container space?
Containers are isolated processes that run on a single operating system. Much like virtualization, containers will consume CPU, Memory, and Disk space, but require significantly less to run, as they are dedicated to a single function or process.
Any time a container is created a full operating system isn’t required. A container runtime such as containerd and interactive management layer such as Docker, make it possible to manage containers and resources, locally on a singular host.
Networking Namespaces
Networking namespaces are used for container isolation. You can spin up a process and wrap it in networking namespace which is simply an isolated network.
Example
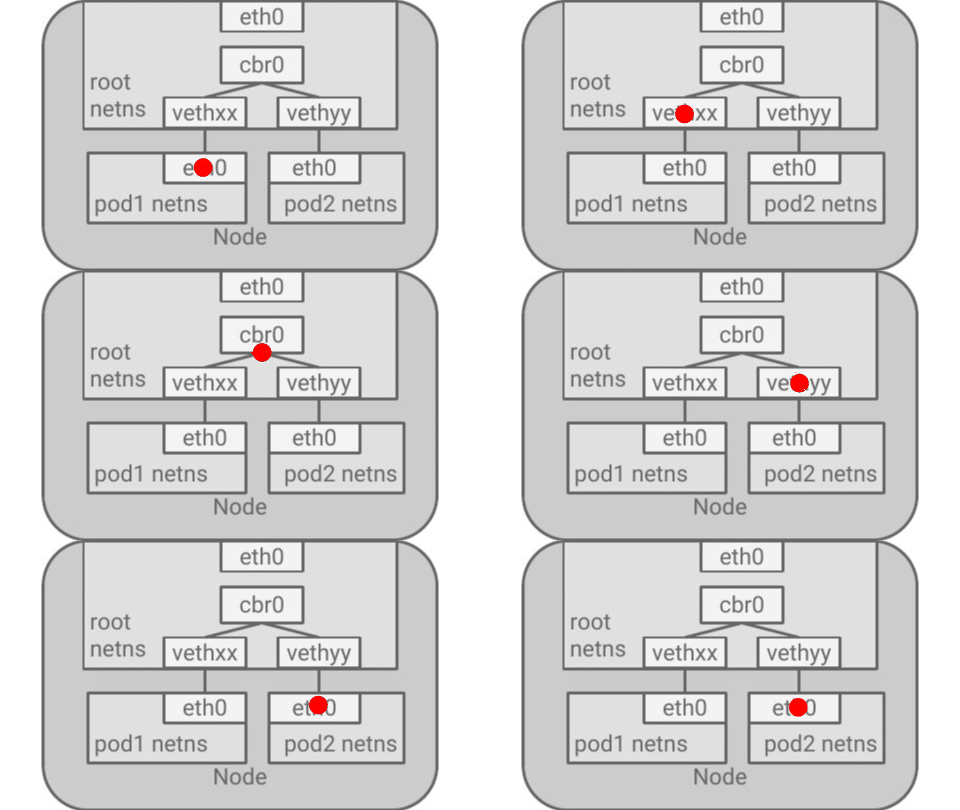
Example of a TCP packet traversing a kubernetes node from one container to another

Vagrant Lab
Building Networking Namespaces
We’re going to build a couple of networking namespaces to be able to have each namespace interact or communicate with each other. We will also need to run a few additional commands requiring a quick installation.
Let’s now output those namespaces in the terminal
Next lets find out what interfaces List the interfaces on the host
And let’s do the same for each network namespace we created.
ARP
You can even use arp on the host to see what MAC address and IP addresses show up (remember each MAC is associated to an IP), but you will discover that these endpoints in each namespace don’t know about each other. These are isolated “broadcast” domains if you will.
Bridge
Now, in order for these two network namespaces to communicate with each other, we need to either create a virtual wire or virtual bridge.
The two network namespaces we created are representative of two different endpoints in their own isolated domain. Let’s bridge them together.
We can verify this by checking the routing table of each host, and the two namespaces. By running the two below, you won’t see entries for any networks. We haven’t assigned any addresses to the two namespaces.
Creating the bridge
So the best way to fix this is to use the Linux bridge functionality. Let’s create one called app-net-0 and then see it present on the host.
If you notice, the state is currently down so we need to turn it up/online.
Attach namespaces ports
Next, we need to attach virtual wires from each namespace to a port, which we’ll attach to the bridge shortly.
We also need to assign each virtual wire’s endpoint an IP on the 192.168.52.0/24 network, and as well, an IP for the bridge on the very same subnet.
This is like assigning an IP address to a process in its own namespace, or even, assigning an IP to a container. This allows for all three to communicate with addressing in the same broadcast domain and subnet.
// Specifies the virtual pair device name of the _VETH/VXCAN_ tunnel.
ip link add veth-sleep type veth peer name veth-sleep-br
ip link add veth-webapp type veth peer name veth-webapp-br

// Set virtual interface to network namespace
ip link set veth-sleep netns sleep
ip link set veth-webapp netns webapp

// Set master device of the device
ip link set veth-sleep-br master app-net-0
ip link set veth-webapp-br master app-net-0
Assign Ip Adresses
Let’s add the ip to the bridge we created earlier and attach the virtual wires of the namespaces to it.
Routing
If you ping the sleep namespace endpoint, it will go through as the host’s app-net-0 interface/bridge can communicate with this namespace
But, if you attempt to ping something external to the network (like the IP of google.com), it will report as unreachable because no default route exists or we aren’t using network address translation.
Outbound
Let’s fix this using an iptables rule that allows us to NAT the 192.168.52.0 with an IP on the host that can communicate outbound.
So it seems like we are still missing something, let’s check the routing table. Where is our default route? Let’s add it. And let’s also tell the kernel to forward this network traffic as well.
// Show route for webapp ns
ip netns exec webapp route

// Add default route as the bridge
ip netns exec webapp ip route add default via 192.168.52.5

// Enable forwarding
sysctl -w net.ipv4.ip_forward=1

// Test
ip netns exec webapp ping 8.8.8.8
Now, you can ping google website !!!
One More test
Netcat to listen in 4444
Connect to Netcat with telnet
See traffic go through the bridge
That’s all folks
Questions ?
Container is Awesome